Showing posts with label crafting. Show all posts

Friday, January 2, 2015

Toddler Sensory Bins

Winter Break has been a delight for the Hubs and I, both of us being off work. Kid has gone to daycare a couple of times so we could finish up some cleaning and Christmas shopping. Other than that, we have enjoyed our time together.

For the most part.

Kid will be 2 in April, and I think we have reached the terrible twos a few months early. He can be downright nasty.

Like 99.9% of moms, I love my son to the moon and back a thousand times. He has my heart.

And like all moms, sometimes, I need a break. The tantrums, the whining. Sometimes, I just need a break.

I've noticed in the last few weeks that Kid has needed task-oriented activities. Playing with a truck on the floor doesn't keep him occupied for more than 2 minutes. Building a puzzle train will hold his attention for 10.

Cue sensory bins.


We had plenty of sensory bottles at the preschool where I used to work. We have a water table and sand table where I currently work. But I didn't want a bajillion little bottles floating around my house filled with noodles and pompoms. Plus, Kid isn't so interested in those. I also didn't want a sand table inside my house. There is a sandbox outside for that! And a water table?! Well, you might as well just take a bath!

I wasn't planning on picking up the materials for sensory bins any time soon. It had just been on my mind. But, then. I walked into Target and saw that their organization stuff was on sale! Woo hoo! I picked up the necessary materials and headed home. Sensory bins were ready to go!

To make the same sensory bins I made (noodles and rice) you will need:
  • 2 medium sized storage bins with lids. Trust me. You need lids.
  • 1 large bag of rice
  • 1 bag of garbanzo beans
  • 3 to 4 boxes of elbow or rotini (or both!) noodles
  • various small objects (I picked up a package of magnetic letters)
  • scoops or measuring cups
The how-to (this is tough, pay close attention):
  • Place your storage bins on the counter and take the lids off.
  • Open the bag of rice. Dump the rice into the first bin and add the letters. I added two scoops, because I knew we would have friends over to play.
  • Open the noodles and dump those, along with the garbanzo beans, into the second bin. Add two more scoops.
  • Done!
If your kiddos are anything like Kid, find a place to store these out of sight. Bring them out when you're ready for some messy fun! And believe me when I say it's a mess. We had rice everywhere!


But! He was occupied. I got to unload the dishwasher by myself! I made lunch without a hungry toddler sitting on my feet. And that, my friends, is a blessing in and of itself.

Monday, December 29, 2014

Christmas Art

I know, I know. Christmas has come and gone. Most people post their Christmas tutorials before Christmas, not after. But here I am. A few days after Christmas and wanting to show y'all our Christmas art. I made these just a few days before Christmas (can you tell I'm a last minute person?).

This post, from Jessica Lynn Writes, was my inspiration. I wanted to change things up a little bit, so I came up with a few of my own sayings. I loved the way hers turned out, so I headed over to PicMonkey to make my own.


Wait a minute. Those aren't Christmas! Nope, those are the year-round sayings.

I hosted a truffle making party the weekend before Christmas and wanted to make the house a little more festive than it was. At that time, I only had an undecorated Christmas tree up and a few Department 56 houses. No stockings, no Christmas cards, no ornaments. It needed to get festive up in here.

I hung the ornaments (on the top 2/3rds of the tree) in a toddler-proof fashion. I took down our living room art and hung the stockings. And I designed some artwork for the dining room frames. Christmas inspired, no less.


These three beauties hang in our dining room until it's time to pack away all of the Christmas stuff. The "Merry Christmas" one is printed larger than the others and hangs in the middle. It's framed with a chunky black frame. The other two are a few inches smaller and are framed in white.

I think they're pretty neat!

**Shameless plug: let me know if you're interested in purchasing the digital file.
I'm thinking of going all Etsy style.**

Saturday, December 28, 2013

Handmade Teether Toy

Baby toys can be incredibly inexpensive, or ridiculously expensive. I have a little munchkin that likes to chew on everything (which could have something to do with the 4 teeth he's working on right now). I like to keep toys around so he always has something to play with chomp on. I, of course, ran to my local Target store to find some inexpensive toys/teethers. I noticed one specific teether that I thought Kid would enjoy, but was irritated by the price.

Five bucks for a little stuffed ring? I could spend five bucks to buy six baby washcloths and make three teether toys for that price!

And that is what I opted to do. I found a package of cute colored baby washcloths, which are super soft and set to work.

I've only finished one of the three toys. The other two are in various stages of complete. They'll be finished shortly, but I wanted to get this post up and running.

Depending on the size of the teether, each toy will take 1 to 2 washcloths. I went with two for each, because I wanted to vary the pattern and color on each toy. They toys will also need some craft stuffing, which is super cheap at any craft store.

First, the washcloths should be washed. More than likely, they'll end up in someone's mouth. There may be some nasty chemicals on the washcloths due to manufacturing and/or shipping.

Once the washcloths are washed, and dried, deciding upon a shape for the teethers comes next. I went with a nonsensical shape to start, then moved on to a tooth, and a ring.

Place the washcloths together with the right sides facing each other. Here's the catch. There is no right or wrong way to do this. The texture of the teether can be either side of the washcloth. The ones I bought had a smooth side and a side that looks like the typical terrycloth of a towel. I wanted to have a toy with multiple textures, so I put the smooth and bumpy sides together and pinned the crap out of it. One would typically trace or draw a design on the fabric with one of those fancy disappearing fabric markers.

Not me.

I just cut. This worked out, because I didn't have a specific shape in mind for the first one. But, a shape can be traced onto a piece of paper, which can then be used as a sewing pattern for the toy.

That's not how I roll.

Once cut, sew the two pieces together. Leave an opening in the sewing, for two reasons:

1. to flip the toy right-side out.
2. to stuff the toy with some craft stuffing.

After stuffing the toy, sew up the opening with a needle and thread. I'm not too picky about the finished look, especially since it's a baby toy, but I didn't want to have any threads hanging out for Kid to potentially chew off of the toy. I followed this tutorial on how to make an invisible seam.

Here's the finished product:


I promise that I will get better with pictures. It's one of my New Year's Resolutions for the ol' blog...

Tuesday, November 26, 2013

Step By Step Nursery: Mobile

Way back when I was newly pregnant, I began searching Pinterest and Houzz for nursery inspiration. Mostly, I was looking for a color scheme or a theme. Something to guide my projects. The hubs and I decided on some colors, a stripe pattern, and the fact that we didn't want an overbearing theme that would take over the entire room.

We I decided upon a diaper storage solution that I knew would be a hit, but I knew we needed a little bit more.

Then, it all came together. I had been having this feeling that I would give birth a day early (wow, was I wrong). I thought for sure that I would give birth on May 14th. The anniversary of my Boppa's death. Because I was sure that Kid would be born then, I wanted to honor Boppa in some way. I wanted to create some sort of connection between Boppa and Kid, mostly because I knew that Kid would be born on the anniversary of Boppa's death.

I had the perfect idea! I mobile of P-38s. My Boppa was a pilot during World War II. He flew P-38s. Isn't he a handsome Boppa?


Kid had to have P-38s in his room. And the mobile was the perfect place.


The mobile is hanging over his diaper pail. I didn't want to put it over his crib or the changing table. It is far to heavy. Each airplane is metal...and they're kind of heavy. I would hate for a plane to fall and hit the baby. So. Over the diaper pail, in the corner of the room. Away from where the baby (or anyone) will hang out.

Saturday, August 3, 2013

Canvas Art

Kid's nursery is slowly coming together! Being that he was six weeks early, we didn't have everything all set to go when we got to bring him home from the hospital. Day by day, we add a little more. Hopefully it will be done before he's a year old!

A few weeks ago, I decided to hang the canvas art I had mad for his nursery. It looks wonderful!

I wish I could link to the pin that I used as inspiration, but I guess it was one that I didn't actually pin. Whoops! I'm sure you've seen them, though, if you peruse the DIY & Crafts boards. You know the canvas art I'm talking about? Where you paint a base color, add some stickers, paint again and then peel the stickers off?

I was totally going to do that.

But. I couldn't find stickers that were big enough, in a font I wanted.

Plus. The saying I chose was long. I would have needed a hundred packages of stickers.

Maybe I exaggerate.

Instead, I decided to buy some stencils (in a font I liked) from Michael's and go that route. It worked so well!

At first, I was going to do "You are my sunshine / My only sunshine / You make me happy / When skies are gray." That was when I was convinced we were having a girl.

But. Kid is a boy. I could have done the same saying, but a friend gave me this book by Robert Munsch. And then, I knew. I knew exactly what saying I was going to use for the art in Kid's room.

"I'll like you forever
I'll love you for always
As long as I'm living
My baby you'll be."

It doesn't get much better than that, now, does it? I had the book growing up. I remember reading it to my little brother. When my friend gave it to me at one of the showers for Kid (the one that happened 5 days after he was born), I knew I wanted that saying somewhere in his room.


Sunday, July 14, 2013

First (and probably last) Furniture Makeover

I love to peruse blogs and Pinterest to see the amazing furniture makeovers that people complete. After spending a few minutes hours doing that, I typically head over to Craigslist to see if there are any cheap pieces of furniture to do my own rehab.

While pregnant with Kid, I did just that. My goal was to find a changing table for under $75. I found a super cheap one and contacted the seller right away. Cheap-o as in $25. Pretty cheap, pretty awesome. It was a fairly ugly changing table, but in working condition, so we bought it and brought it home.

It's one of those particleboard changing tables, covered with a super ugly wood grain veneer. Just not cute, and not my style. At all. So my project was to complete the changing table (and nursery) before the boy arrived. Because he was 6 weeks early, none of that happened. I started the changing table before he was born, but it wasn't finished until 3 weeks after he was born. And the nursery? That still isn't complete. I'm working on it.

Here is my furniture makeover:

I, of course, did not get around to taking a before picture. Whoops!

But here is the after:
don't pay attention to the dog head...I was in a hurry!
Isn't it nice? I used the same brown that was used for two of the stripes in Kid's room. I like how dark it ended up, after two coats and some polyurethane. I'm thinking, though, that I want to change the color of the drawer pulls...thoughts on that?

But here's the thing. I am not a fan of redoing furniture. It takes FOREVER. Especially if you're pregnant and fume-sensitive! And then, when you have a newborn in the house.

But in reality, it was the best thing to do. We paid $25 for the changing table. And that was it. We already had paintbrushes, primer, brown paint and polyurethane from other projects.

So, at 25 bucks, it was pretty cheap (but the most expensive piece of furniture in Kid's room).

Linked up here and here.

Tuesday, January 22, 2013

Lessons in Crochet

I'm sorry if you stumbled upon this post looking for some actual lessons on crochet. I'm not the person to look to, as I have only just recently completed my first non-hat crochet project. And it turned out. Sort of.

I found a book at Michael's with crochet projects for baby. Baby boy is, of course, the motivation for crochet/any projects I've thought of as of late. My goal was a sweater. A pattern in the book claimed to be easy...but how can it be easy if you've never read a crochet pattern before? So for me, I'd list the pattern is "intermediate."

Either way, I completed the sweater mostly as described in the pattern. I had some issues with the yoke, so I improvised. It looks like a sweater. The sleeves are proportionate to the body, and it looks like it will fit a child.

Except I never checked the gauge of my crochet skills and the hook listed in the pattern. Eager me just started crocheting. I followed the directions to make a sweater for a six month old. It'll probably fit a one year old. Which is fine, I just won't get to use the sweater as soon as I had hoped.

Yesterday, I started a cardigan for the boy as well. I dove right in without checking the gauge and wondered why, again, was this sweater (meant for a 6 month old) turning out to be so huge?! Luckily, I was only four rows in before I realized that maybe the crochet pattern writers were on to something with gauge-checking. So I crocheted my 12 stitches with the hook listed in the pattern. Twelve stitches should have been four inches. In my case? Six.

Well, there ya go. Tried the same with a smaller hook: twelve stitches, four inches. I was set to go. And now, four rows in to this sweater? It looks like it'll fit the average 6 month old.

Someday, I'll learn to just follow directions. Until then, I'll continue to learn from my little mistakes!

Saturday, July 28, 2012

Two!

Miss Bean, my adorable niece turned two on the 21st of July. How can that be?

It seems like just yesterday, my sister called to let us know that she and her husband were headed into the hospital. Being the close family that we are, we all jumped in the car to be there when the bean was born. Shortly after 5am, we were welcomed back into the room to meet the new addition. Quite the tiny thing she was. Of course, we passed her around the room and snapped tons of pictures.

And now the little lady is two, and she is quite the silly little girl. I love the way she yells "oh man!" and "awesome at the appropriate times. And if the theme song to Dora comes on? Dance away she does!

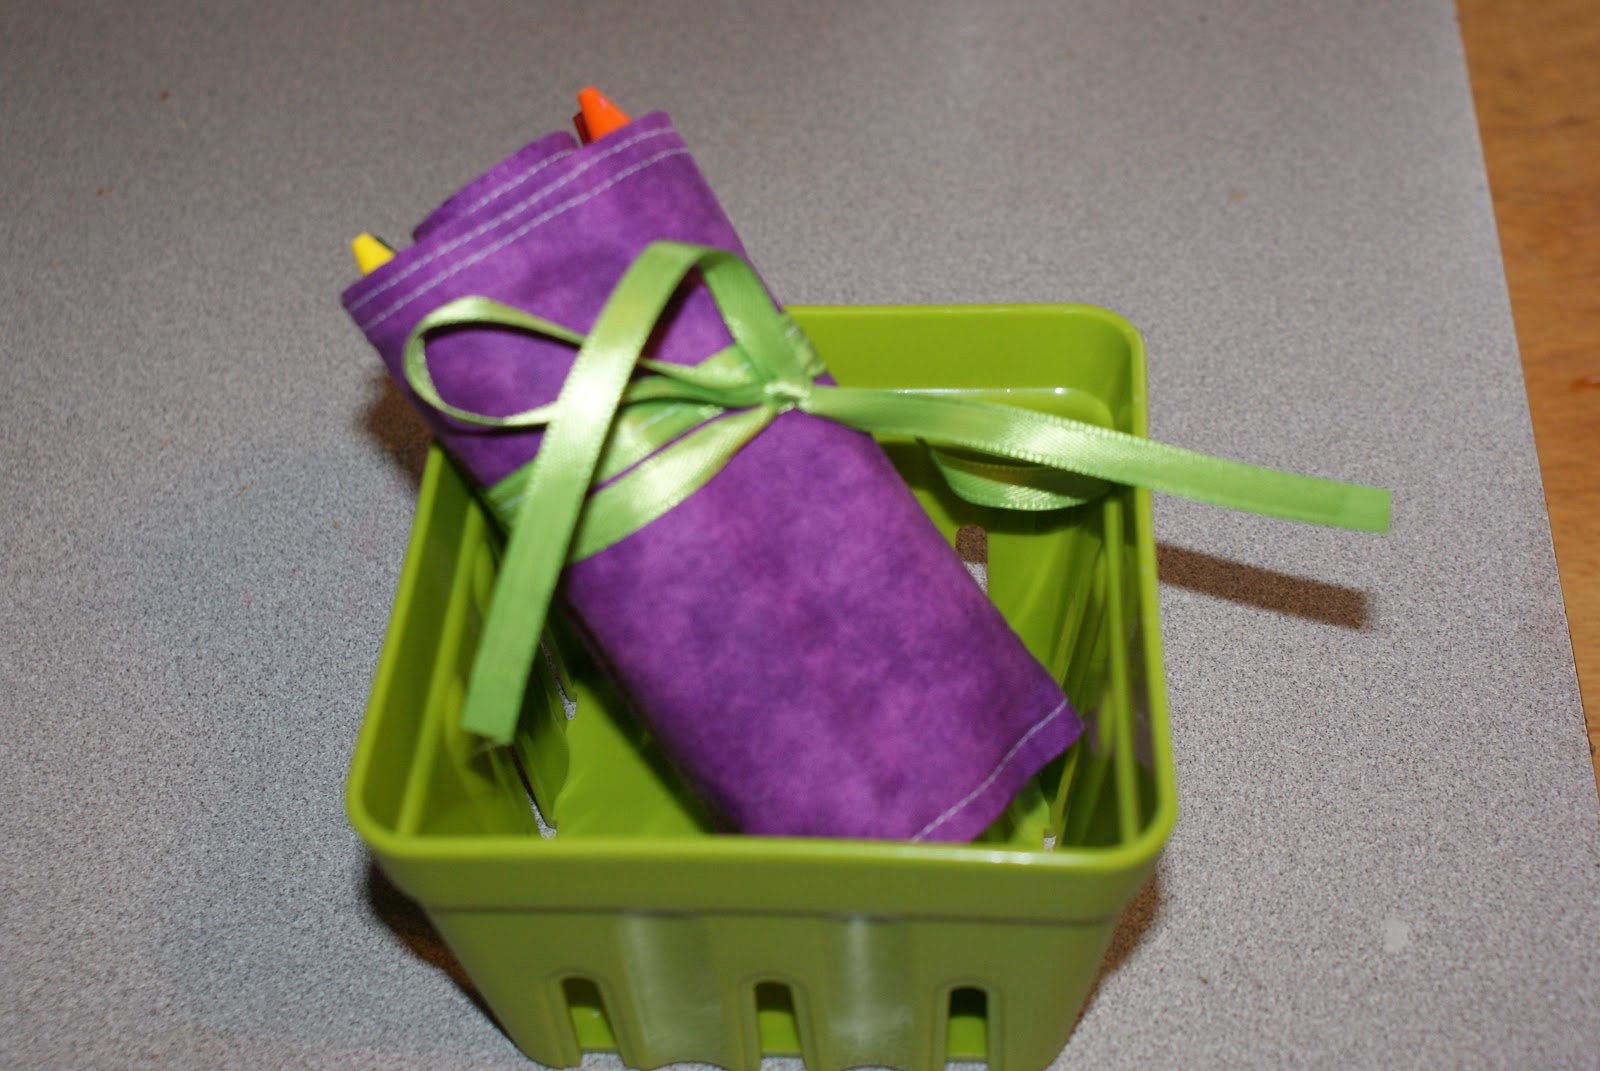
We celebrated the Bean's birthday at an indoor play place. I, of course, had to get her presents (yes, plural!). Inspired by an old friend's (friend is used loosely, we hung out in a large group of friends throughout high school, but never really got to know each other) goal for a year of handmade gifts, and a particular gift she made for her daughter's friend, I decided making something for Bean was a great idea!

I scoured the internet for a jumbo crayon roll pattern and found this tutorial at Raising Oranges. The only difference between mine and hers is that I used a ribbon closure instead of a binder. And, I can't sew straight.


But all that matters is Miss Bean loved it (and the Dora coloring book). And being handmade makes it even more special. I may not ever be able to do a year of handmade gifts, but it is definitely something I'd like to do more often!

Monday, July 16, 2012

Thrifty!

I had a few errands to run today, including REI (favorite store!) and the fabric store. I also had a few things that needed to be donated to the local Goodwill. I've found that I have frequented the donation line, but haven't taken the time to peruse the shelves.

As of late, my mom has been talking up this thrift store that opened a few months ago near her work. She was at work today, so I called to see if she wanted to meet me at Bethesda to wander the aisles. Mom has a new thing for dishes and she finds beautiful ones at random thrift stores all the time. I was pumped.

I've seen super DIY projects involving trays that have been spiffed up and I wanted to try it for myself. I just needed a tray (or two). Mom said that I would "for certainly" find one at Bethesda.

We walked into the thrift store and saw the sign that saved me even more money: 60% off housewares. Woo-hoo! Mom brought me right to the aisle with all of the dishes. She pointed out the sets she had her eye on. She also pointed out the things that I had dropped off at her house to donate (super cool to see, by the way!). I saw my old frying pan, a casserole dish and a soup bowl that I had dropped at her house a week ago.

Mom and I did a quick swoop down each aisle, then started over walking more slowly, actually picking through the items.

We soon realized  that we needed a cart. It was that good.

Here's my loot:


This cute green mail sorter was $1.49 (and then 60% off!). It had some black and gold labels that I peeled off before I took a picture. I promise I'll get better at this blog with pictures thing soon! I plan to put it on the wall at the top of our stairs because the hubs and I are terrible with mail. It'll be nice to have a place for it to rest.


This white pot with a lid... My dear friend has a red ceramic pot that sits on her counter for the food scraps to be taken out to the compost bin. I immediately wanted one for myself! Her mom picked hers up at a thrift store, and all I could think of was Nordic Ware Dutch Oven (um, expensive). But! I found this one at Bethesda for 99 cents! AND THEN! 60% off! I am already in love with this store.

And the I found what I went to the thrift store for in the first place. The trays! The price was a bit surprising to me, but, it did come with three trays. And, it was on sale for...you guessed it, 60% off. 6 dollars and some odd cents for three trays? Yes, please! (I still haven't gotten around to taking a picture of them. In fact, they're still in my car.)

I had a few tips from some blogging friends that Lowe's may have a better spray paint selection than my local Home Depot, so I plan on heading that way in the next few days to get to work. I may also stop by the brand new Fleet Farm (one of my favorite stores). My mom used to say: If you can't find it at Fleet Farm, you probably don't need it.

Monday, July 2, 2012

Fish Stand

Hello, friends and happy Monday!

I am in need of your help. You see, I teach kindergarten and each spring, we do a unit on animals. We study goldfish and, at the end of the unit, students that get the "okay" from their parents, are allowed to take a goldfish or two home. One year, none of my students were allowed to take the fish home. I was stuck with 9 teeny tiny goldfish. My husband (he was my fiance at this time) remembered the old aquarium in his parents garage. It was the aquarium that he took to college. The same aquarium that my father-in-law got as a middle schooler. The hubs was willing to take all 9 goldfish.

We searched and searched and searched for the perfect stand for the aquarium. And then we realized that the perfect one was waaaay to expensive. So we used an old TV stand that Husband's parents also had in their garage.

And it is feo (that's Spanish for "ugly"). See? (Sorry if you have this item in your house. A friend of mine does, and it makes me feel bad for calling it ugly. Everyone has their own opinions, right?)


I am going to redo the fish stand, but I need some help choosing colors, etc. I also am thinking about making bigger doors...what do I use to make bigger doors? Plywood? These are the things that I just don't know.


Suggestions please!

Friday, June 29, 2012

My $3 Centerpiece

Yesterday I was given a 100 dollar bill to "play" with. I was overjoyed, in fact, I think I smiled for an hour. What a wonderful gift!

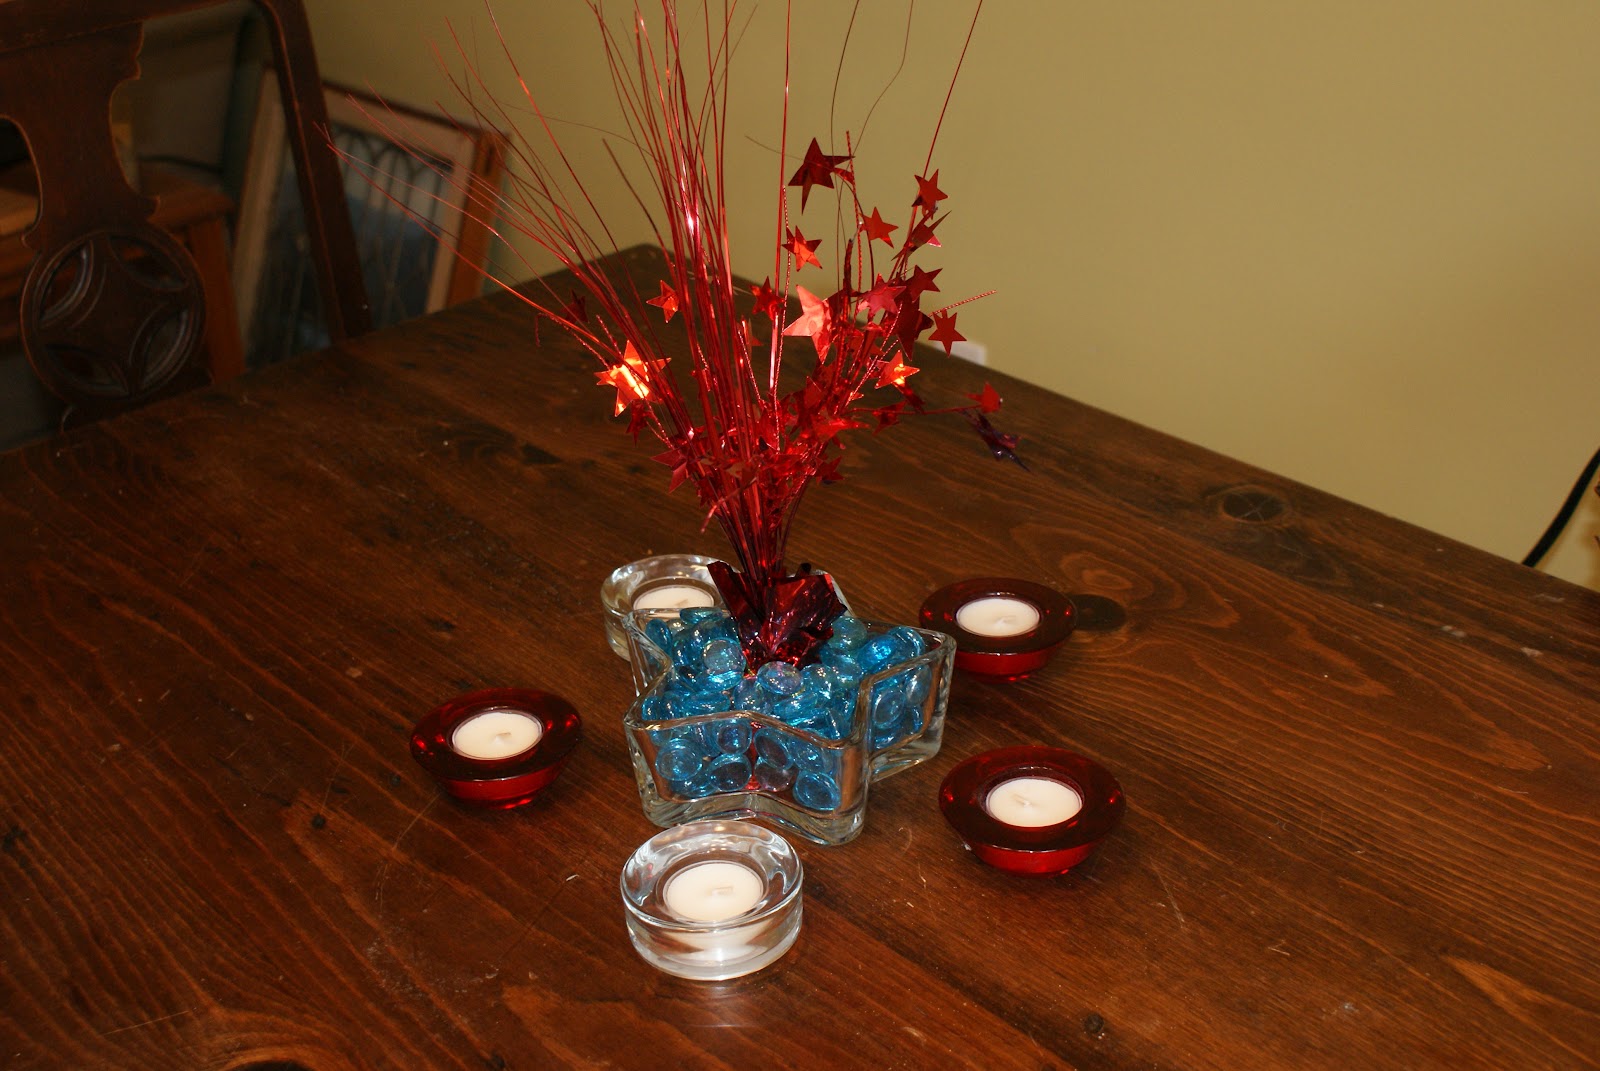
So far, I have spent $3. It was awesome, but it was also a little bit sad to break the Benjamin so easily and so quickly. I spent it at the dollar store, so it wasn't that bad. And, I was able to make a wonderfully patriotic centerpiece for the 4th of July (even though we won't be here!).

I saw this balloon weight right away and thought it looked pretty neat.


My original thought was to put it in a tall vase with some "pebbles" I already had at home. After a few more minutes of wandering the aisle of the dollar store, I found this glass...I don't know, is it considered a bowl? dish? I also saw that they had some of the pebbles I had at home, but in blue. How fantastic!
  

Assembling the center piece was easy-peasy. I found the clear tea light holders in my bin of supplies that I had purchased for figuring out wedding centerpieces. The red ones were part of a housewarming gift from my godmother. They usually spend their time lined up on top of the toilet tank, but I think I like this look better:


Tuesday, May 1, 2012

Holy Busy, Batman.

Here's the thing.

I am home right now, and have been for about 15 minutes. I need to leave in 25 minutes. This is my life for the entire week, and next. Needless to say, it is a busy time of year. I feel like the husband and I have been go-go-go for at least a month now. In fact, I don't remember the last time I actually went grocery shopping and bought more than just what was needed for that night's dinner. I don't like that.

I did get the chance to run to the fabric store. Let me admit something quickly. I was crabby Saturday afternoon. Since I was home alone, I decided to head to my local fabric store to learn that it will be moving in a few weeks. SALE!

I bought $110 worth of fabric and paid $23. Totally awesome. I have some awesome plans for the fabric: pillows, a skirt for my niece, pants for my nephew. I can't wait to start creating and show you all the awesome things I make! Wait a minute, though. I don't know how to sew very well (I'd call myself a novice!), so we'll see how these projects actually turn out...

Tuesday, February 7, 2012

Pretty House? Pretty Blog?

I was reading this blog the other night and decided that I wanted to do what she did.

Back in October, she did a little project. Well, a HUGE project. A 31 day (to be exact) project.

She organized her home. And she blogged about it. I loved her ideas, especially this post from day 30. It makes me envious. What's nice is that my husband and I have set aside an entire room for my craft stuff, but it is not nearly as organized as the closet from this post. Her closet is beautiful. I want one.

Anyway, back to my main thought: I'm going to organize my house. I can't promise that I am going to do something every day. There are a couple of reasons:

1. I work full time outside of my home. I have one of those jobs that isn't done when the clock says it's "go home time." I bring work home. I love it, I wouldn't trade it, but it means that I don't have my evenings free all the time.

2. Another job "excuse." I am unable to access my personal email/personal blog websites at my workplace. Having that access would make it a lot easier to update this little blog more frequently...

3. My husband and I are just married, recently out of college, working on our masters, going to re-do our deck, thinking about painting our house, and buying a dog. Needless to say, our money is well budgeted. And there isn't a budget for blogging projects. Wouldn't that be fun, though!?

My plan is to do a modified home organization series. Modified in that it won't be every day (I'm going to shoot for once a week...).

Thanks to Lindsay for sharing a link to Kelly's The Complete Guide to Imperfect Homemaking blog!

Sunday, January 29, 2012

Sweater Pants!

I ran to Target the other day and picked up a super cute sweater on clearance for $3.50. Steal! Sadly, the sweater did not fit. I found myself at Google, wondering what I could do.

Then, I was reminded of one of my favorite sites: Prudent Baby. I love, love, love Prudent Baby and think it is so wonderful that they have a tab for projects by craft. I can go see all of their sewing posts with a simple click. It. is. awesome.

Anyway, I remembered seeing this post about sweater pants and figured my super cute blue and green sweater would be perfect. And it was.

I had some elastic in the amazing sewing hutch I received after the passing of Mr. Husband's grandma. I had my lovely sewing machine ready to go.

The tutorial was super easy to follow, and the pants were finished in 15 minutes. I gave them to my niece and had her try them on. She's on the small side for her age (18 months) so the pants were a bit long. Believe me, it was easy enough to roll the bottom of the pants for a perfect fit.

If you have any old sweaters lying around, sweater pants are a simple project (and a quick one, too!).

Thursday, December 8, 2011

The Organized Life

Organization is something I very much enjoy. I love bins with crisp white labels. Drawer organizers bring a smile to my face.

Mr. Husband and I moved into our house and are not yet living the organized life (sad day). I know that eventually we will get there. Just not quite yet.

Today, though, was a big step toward the organized life. Our home has three bedrooms. Two are on the main living level. Being that we are in a split-level home, the two bedrooms are upstairs. The third bedroom is in the basement. From the beginning, upstairs bedroom number two was to be the office. We completed it with a computer and desk, filing cabinet and three bookshelves. Will all that space for storage, Mr. Husband and I still managed to keep a pretty cluttered and pretty messy office. The culprit you ask?

My craft stuff.

It was everywhere! Now, before I get ahead of myself, I need to talk about bedroom number hree. My husband and I love just about every outdoor summer activity and are slowly getting into quite a few outdoor winter activities. That being said, we have a lot of stuff. The easiest thing for us to do was to out all that "stuff" in the basement bedroom. Man, did it every get full! Golf clubs, snowboards, tents, sleeping bags, luggage, backpacking backpacks, snowshoes. The list continues with more stuff that was taking up way too much space and was not stored properly. Only one of the bedrooms in our house was functioning properly, and that's only because the only thing we do there is sleep.

Back to the craft stuff. I have a lot of that, too. I finally bit the bullet and bought those clear and stackable shoebox sized storage containers. I used some extra white return address labels and a Sharpie to get to work. Before I do anything, I have a habit of writing a list. I jotted down ideas for the buckets I would create: things that stick (glue, tape, etc.), things that cut, paper, stamps, block carving, paint, paint brushes, ribbon, sewing stuff, markers and crayons, stencils, ink pads, and a bin for miscellaneous stuff. I filled up ten bins! Ten bins of stuff that had previously been in bags on the floor. It felt SO good.

When we bought our house, the downstairs bedroom had a lovely white desk and hutch. With the hutch removed, I knew it would be the perfect sewing table. And here my sewing machine sat since I got it, untouched. I couldn't even fit a chair in that bedroom.

In an attempt to make a long post as short as possible, I spend the day in the downstairs bedroom. I made my way through piles and piles of things. I gored our backpacking packs and day packs properly. Our snowboards are within reach (we better get more snow!). The snowshoes were moved to the garage, along with the golf clubs and tennis rackets.

My lovely labeled clear stackable bins were moved downstairs. My bin of leftover fabric is actually near my sewing machine. I have paint, paintbrushes and canvas all in the same room. And, My chair fits in the room (pictures soon).

I'd venture out and say that today was definitely a success.

Wednesday, November 30, 2011

Therapy for All!

I need to learn to squeeze more things into life.  Here's the thing. I love to make, to create things. To me, it is soothing. I had such a productive weekend. Putting up and decorating the Christmas tree, adding Christmas decorations to our house, making stockings and pillows. It was wonderful and I loved every minute of it.

But now, the work week is back. My evenings are filled with making dinner, which in and of itself is a creation, but my culinary skills are still at the recipe-following (to a T) stage. Eventually, I would like to get beyond that point so that cooking does become a creation. I'm not there, yet. The laundry piles up in the basement and the dishes pile up in the sink, even though we have a dishwasher (thank you in-laws for the wonderful dishwasher last Christmas!).

I need to make the time to crochet at night. Or paint, or sew. If only for five minutes. Maybe sewing, painting, creating is my therapy. Therapy or not, I love it and need it in my life.

Everyone needs a little therapy, anyway.