Showing posts with label experimenting. Show all posts

Monday, March 31, 2014

Kombucha

Y'all know I'm a teacher, right? So when I say "one of my moms" you know that I'm talking about a student's mom, right?

Okay, good. Glad that is cleared up.

One of my moms drinks kombucha every day. Have you heard about kombucha?

I hadn't, until Kid was about 5 months old (when school started). I had read an article or two that mentioned kombucha, but I didn't look into it beyond that.

Then I saw that one of my moms always had a bottle of kombucha with her. So I chatted with her about it. She says that, instead of buying a Starbucks every day, she buys a bottle of kombucha. Yep, it's about $5 per bottle.

And then, it some how got brought up at daycare one day. My daycare lady makes her own kombucha! Say what!?

If you don't know what it is, check out this article.


I'm brewing my own kombucha, kids. The daycare lady gave me a SCOBY, and I'm giving it a go. I don't really know that much about it, though. My husband was a little concerned that it was something for Kid. I reassured him that it was for me; Kid wouldn't be drinking any and I wouldn't make hubs drink any.

So. Here is what I have learned about brewing kombucha:

It is unbelievably easily. I made the tea. Added the SCOBY and starter. Covered the jar with towels. And it's been hands-off ever since.

It's weird. The SCOBY thing? Weird looking! It kind of looks like...chicken? Or a hunk of some sort of meat. But it is white-ish. Interesting.

I have yet to taste it, though. The daycare lady said that it would take a few tries to get it to my preferred taste. She adds fruit to hers. Again, interesting.

Tuesday, January 22, 2013

Lessons in Crochet

I'm sorry if you stumbled upon this post looking for some actual lessons on crochet. I'm not the person to look to, as I have only just recently completed my first non-hat crochet project. And it turned out. Sort of.

I found a book at Michael's with crochet projects for baby. Baby boy is, of course, the motivation for crochet/any projects I've thought of as of late. My goal was a sweater. A pattern in the book claimed to be easy...but how can it be easy if you've never read a crochet pattern before? So for me, I'd list the pattern is "intermediate."

Either way, I completed the sweater mostly as described in the pattern. I had some issues with the yoke, so I improvised. It looks like a sweater. The sleeves are proportionate to the body, and it looks like it will fit a child.

Except I never checked the gauge of my crochet skills and the hook listed in the pattern. Eager me just started crocheting. I followed the directions to make a sweater for a six month old. It'll probably fit a one year old. Which is fine, I just won't get to use the sweater as soon as I had hoped.

Yesterday, I started a cardigan for the boy as well. I dove right in without checking the gauge and wondered why, again, was this sweater (meant for a 6 month old) turning out to be so huge?! Luckily, I was only four rows in before I realized that maybe the crochet pattern writers were on to something with gauge-checking. So I crocheted my 12 stitches with the hook listed in the pattern. Twelve stitches should have been four inches. In my case? Six.

Well, there ya go. Tried the same with a smaller hook: twelve stitches, four inches. I was set to go. And now, four rows in to this sweater? It looks like it'll fit the average 6 month old.

Someday, I'll learn to just follow directions. Until then, I'll continue to learn from my little mistakes!

Sunday, August 19, 2012

{recetas} Cucumber Dip

The garden is producing cucumbers like mad.

And I love it.

The husband and I had a party to head to tonight and were in charge of an appetizer. I figured my mother-in-law's cucumber dip would do the trick, especially since I needed to use up those cucumbers. Por supuesto, I changed a thing or two. In reality, I didn't have a recipe, only a recalled conversation on how to make cucumber dip.

Yes. It is that easy.

Honestly, though, summer would not be summer without it.

What you need:
  • Cucumbers (4 large, but you kind of have to judge by taste/consistency)
  • 2 packages cream cheese, at room temperature
  • 1 teaspoon salt (or to taste)
  • 1 teaspoon garlic powder (or to taste)
  • 1 teaspoon pepper (or to taste)
  • quarter cup water
What you do:
  • Wash, peel and chop your cucumbers. I used cucumbers from the garden, and sent my husband (he's such a gem) to the store halfway through making the dip because the dip needed a few more.
  • Put all of the chopped cucumbers in your stand mixer or in a bowl. Toss in the two packages of room-temperature cream cheese and mix. My dip was stiff. Maybe too chunky? So I added a quarter cup of water and turned the mixer on again (doesn't that thing make life easy?).
  • Add the teaspoon of salt, garlic powder and pepper. I also added a few twists from the garlic pepper grinder because it's fun. This part, of course, is all to taste. My mother-in-law doesn't like pepper, so she doesn't add that. I think it tastes better that way. I also add more garlic that she does. Everyone has different taste buds, right?


 Serve with tortilla or pita chips and enjoy!


Monday, August 13, 2012

{recetas} Homegrown Tomato Sauce

As mentioned before, my husband and I were up north for a week. Before we left, we looked at our tomato plants and realized that most of the tomatoes would be ready to go while we were away. My parents came to the rescue, once again.

We had them stop by our house to check on/pick the tomatoes on our 15 tomato plants. Needless to say, we came home to a bowl full of tomatoes.


It has been rainy today, and for some reason, rainy days mean spaghetti to me. Okay, it was probably the bowl of tomatoes that were screaming "spaghetti sauce!" I performed the infamous Google search (do I say that in every post?) to find a recipe for fresh tomatoes.

As usual, I found exactly what I was looking for over at Smitten Kitchen ... easily one of my favorite cooking blogs! She had the most perfect, most customizable recipe I could find. So I went with it.

This recipe was adapted from the Smitten Kitchen.

What you need:
  • about 4 pounds of tomatoes (they don't have to be pretty!)
  • quarter cup olive oil
  • 2 teaspoons minced garlic
  • half of a carrot, minced
  • 1 tablespoon minced onion
  • 1 hot pepper (couldn't tell you which kind, we found the pepper plant growing the garden while weeding)
  • 1 lb ground beef
What you do:
  • First, you have to peel the tomatoes. This isn't something I have ever done before. I was concerned that it would be really difficult (it wasn't). All you have to do is boil a pot of water, then make a cross in the bottom of the tomato. Put the tomatoes in the boiling water for half a minute, then take them out a rinse with cold water. Peel and discard the skin. Easy-peasy.
  • Depending on the size of your tomatoes, halve or quarter them. Remove and discard the seeds (this took the most time!). Because I don't care for super chunky tomato sauce, I blended them. I placed half of the tomatoes in the blender and blended on low for a minute or so. I removed those and added the rest of the tomatoes.
  • While the olive oil heats in a saucepan over medium heat, mince the carrot. Combine the carrot, garlic and onion in the olive oil and cook for a bit (5ish minutes).
  • Add the tomatoes to the carrots, garlic and onion and simmer on medium/low. 35 minutes is perfect.
  • While the sauce is simmering, brown the ground beef in a skillet. Drain off any excess fat/grease.
  • With about ten minutes left on the timer, add a half teaspoon of salt and a light sprinkling of basil to the sauce. Stir it up and allow to simmer a few more minutes, then add the ground beef.
  • Serve over spaghetti noodles and enjoy!


Please excuse the iPhone pictures...I left my camera at my in-laws' house. Whoops!

While I slaved away in the kitchen, Finn made sure to rest!

Tuesday, July 31, 2012

{recetas} Breakfast Popsicles

Breakfast is much more fun if you get to have a popsicle. Plus, I don't really like breakfast food that much, especially if it is at breakfast. Scrambled eggs for lunch or dinner would be fabulous. But for breakfast? No thanks!

While one of the girls I nanny was at yoga, the Deuce and I made a trip to my local thrift shop. Oh my amazingness. For the last few weeks, I had been looking around (at Bethesda and another thrift shop) for popsicle molds. Just a few days ago, I contemplated buying them new online.

But yesterday's Bethesda trip came through! I snatched the popsicle mold right up. I almost bought a set of 4 aluminum containers, but decided against it. As usual, I sent my mom a picture text to shower her my find for the day. She sent me hers. Including those 4 canisters. We are so much alike, it's unreal.

Anyway. Back to the recipe.

Breakfast Smoothie Popsicles.

Ingredients:

  • 2 cups yogurt of your choice (I used Chobani's strawberry yogurt)
  • 1.5 cups frozen fruit of your choice (mine was a blend of blueberries, blackberries and strawberries)
  • a splash or two of lime juice
  • 4 tablespoons Chia seeds (optional)
  • a handful of spinach (optional; I didn't use spinach this time, but usually I do.)
The steps:
  • Place all of the ingredients into a blender until smooth-ish. It won't be completely smooth, especially if you added the spinach and Chia seeds...or a super seedy fruit.

  • Pour the mixture into the molds and insert the popsicle sticks.
  • Place the mold in the freezer overnight. Breakfast will be ready when you wake up!

Which was 10am for me today. I love summer!

Monday, July 16, 2012

{recetas} Lime Tilapia

This. recipe. was. delicious.

I found it using my wonderful AllRecipes app on my iPhone. It has what is called the "Dinner Spinner" and it is great! You can now add custom ingredients to the spinner, so I added tilapia, since that's what I had in the freezer.

Here is a link to the original recipe, but I modified it a little bit (that's becoming pretty typical for me!).

Here's what I did:

Ingredients:
  • 1 tablespoon refrigerated minced garlic (making it easy on myself!)
  • 1 tablespoon oregano (the dried kind, from those mini jars)
  • 1 tablespoon olive oil
  • 1 tablespoon red wine vinegar
  • 1 tablespoon lime juice
  • 1 teaspoon salt
  • minced onion
  • a couple twists on the garlic pepper grinder
  • 2 tilapia fillets
  • 1 lime
*I did not add sugar or tequila.
*Instead of measuring, I used a small prep bowl and made sure the bottom of it was covered with the minced onion.

What to do:
  • Put all of the ingredients into a small prep bowl (except the tilapia and the lime!).

  • Place the tilapia fillets, one at a time, into the bowl. Be sure to cover each side with the marinade.
  • Oh yeah, preheat the oven to 450 (this is always something I forget to do, and end up waiting for the oven after everything is prepared). Probably a good idea to prepare a baking dish: cover it in foil, spray the foil with a non-stick cooking spray.
  • Place each fillet in the baking dish and "plop" the rest of the marinade on top of the fillets. Place a slice of lime on top of each fillet, and the extras around the baking dish.
  • Cover with foil. Place in oven and bake until the fish is flaky (I think it took my oven about 15 to 20 minutes, with the foil off for the last 5).
  • Serve with a salad (I had Caesar salad on hand, and it wasn't as weird as I thought it would be).

Thrifty!

I had a few errands to run today, including REI (favorite store!) and the fabric store. I also had a few things that needed to be donated to the local Goodwill. I've found that I have frequented the donation line, but haven't taken the time to peruse the shelves.

As of late, my mom has been talking up this thrift store that opened a few months ago near her work. She was at work today, so I called to see if she wanted to meet me at Bethesda to wander the aisles. Mom has a new thing for dishes and she finds beautiful ones at random thrift stores all the time. I was pumped.

I've seen super DIY projects involving trays that have been spiffed up and I wanted to try it for myself. I just needed a tray (or two). Mom said that I would "for certainly" find one at Bethesda.

We walked into the thrift store and saw the sign that saved me even more money: 60% off housewares. Woo-hoo! Mom brought me right to the aisle with all of the dishes. She pointed out the sets she had her eye on. She also pointed out the things that I had dropped off at her house to donate (super cool to see, by the way!). I saw my old frying pan, a casserole dish and a soup bowl that I had dropped at her house a week ago.

Mom and I did a quick swoop down each aisle, then started over walking more slowly, actually picking through the items.

We soon realized  that we needed a cart. It was that good.

Here's my loot:


This cute green mail sorter was $1.49 (and then 60% off!). It had some black and gold labels that I peeled off before I took a picture. I promise I'll get better at this blog with pictures thing soon! I plan to put it on the wall at the top of our stairs because the hubs and I are terrible with mail. It'll be nice to have a place for it to rest.


This white pot with a lid... My dear friend has a red ceramic pot that sits on her counter for the food scraps to be taken out to the compost bin. I immediately wanted one for myself! Her mom picked hers up at a thrift store, and all I could think of was Nordic Ware Dutch Oven (um, expensive). But! I found this one at Bethesda for 99 cents! AND THEN! 60% off! I am already in love with this store.

And the I found what I went to the thrift store for in the first place. The trays! The price was a bit surprising to me, but, it did come with three trays. And, it was on sale for...you guessed it, 60% off. 6 dollars and some odd cents for three trays? Yes, please! (I still haven't gotten around to taking a picture of them. In fact, they're still in my car.)

I had a few tips from some blogging friends that Lowe's may have a better spray paint selection than my local Home Depot, so I plan on heading that way in the next few days to get to work. I may also stop by the brand new Fleet Farm (one of my favorite stores). My mom used to say: If you can't find it at Fleet Farm, you probably don't need it.

Monday, July 2, 2012

Fish Stand

Hello, friends and happy Monday!

I am in need of your help. You see, I teach kindergarten and each spring, we do a unit on animals. We study goldfish and, at the end of the unit, students that get the "okay" from their parents, are allowed to take a goldfish or two home. One year, none of my students were allowed to take the fish home. I was stuck with 9 teeny tiny goldfish. My husband (he was my fiance at this time) remembered the old aquarium in his parents garage. It was the aquarium that he took to college. The same aquarium that my father-in-law got as a middle schooler. The hubs was willing to take all 9 goldfish.

We searched and searched and searched for the perfect stand for the aquarium. And then we realized that the perfect one was waaaay to expensive. So we used an old TV stand that Husband's parents also had in their garage.

And it is feo (that's Spanish for "ugly"). See? (Sorry if you have this item in your house. A friend of mine does, and it makes me feel bad for calling it ugly. Everyone has their own opinions, right?)


I am going to redo the fish stand, but I need some help choosing colors, etc. I also am thinking about making bigger doors...what do I use to make bigger doors? Plywood? These are the things that I just don't know.


Suggestions please!

Monday, June 25, 2012

Adios, amigo.

It's time for me to say goodbye to one of my favorite places. I have looked over the bank statements from the last few months (well, I looked at the account information online) and realized that my husband and I were spending WAY too much money at Target.

I love the place. I really do. It has everything. Target is where I do almost all of my shopping. Groceries. Clothing. It's my pharmacy. And, (I sort of hate to admit this) it's a place I like to go when my mind won't stop racing. I wander the aisles of Target in search of nothing, but manage to leave having spent $20 (on a good day).

But, the amount of money spent at that one establishment is crazy. I usually go to Target with lists, and I buy everything on the list. And then some. There's always something else I want (not need, just want). Like new nail polish. Or a new kitchen gadget (I love kitchen gadgets, by the way).

I usually only stop at Target when I am in need of some groceries. So, I'm changing. I'm saying adios to Target groceries. I have the totally awesome Target debit card, so I have always done my shopping there to save 5%. After wandering the aisle of my local Rainbow Foods in search of Mexican pop, I realized that the prices on some of the things at Rainbow were a lot cheaper. Cucumbers, for example, are 10 cents cheaper at Rainbow. And milk? Fifty cents cheaper!

But what about the 5% off at Target for using their card?

Well. 5% really isn't that much. The cucumbers are still less expensive at Rainbow. My plan for the day (since I only have a tutoring gig today at noon) is to write up my weekly grocery list and head to both Target and Rainbow. I will not buy anything at either store today. My only job is to write down the prices of my most frequently purchased items. I'll factor in the 5% discount at Target and decide from there.

Well, now that I've created a challenge for myself, I guess I can't really say goodbye to Target quite yet... I guess we'll have to see what happens...

Tuesday, June 12, 2012

{recetas} Taco Casserole

I found this recipe on All Recipes and modified it just a little bit. I made it awhile ago exactly how the recipe states, but I like to modify recipes a bit. I do it, mostly, to see if I can. Someday, someday, someday, I would like to be able to cook without a recipe. Practice makes perfect, right?

Here are the ingredients I used the second time I made this recipe:

  • 1 pound lean ground beef
  • 1 can sliced olives
  • 1 package frozen corn
  • 1/2 can tomato soup
  • 1 can southwestern style diced tomatoes (they're Target's brand and have diced tomatoes, chiles, garlic and jalapenos...I think)
  • 1/2 box of elbow noodles
  • enough shredded cheese (colby/jack) to cover the top (didn't measure!)
  • enough tortilla chips to crush over the top
  • a few sprinkles of garlic salt (to taste)
  • a couple shakes of Tajin (to taste) -- found at a Mexican market
  • 1 packet of taco seasoning
The steps:

  1. Cook the noodles to "al dente" status. Preheat the oven to 350.
  2. While the noodles cook, brown the ground beef and add the taco seasoning according to the package directions.
  3. Add the olives, tomato soup, diced tomatoes and frozen corn to the skillet with the beef. Sprinkle on some garlic salt and the tajin (if you want to/have it).
  4. Drain the noodles and pour those in the skillet as well. Mix it all together, then pour it into a 9x13" casserole dish. Cover the top with shredded cheese and bake until the cheese melts (or for 30 to 35 minutes if your dish sat in the fridge because you had to go to class and you made it for your husband to heat up later. Just sayin').
  5. Serve it in a shallow bowl (or on a plate, whatever works!) and crush a few tortilla chips over the top. My husband likes to add a spoonful of sour cream and bit of salsa to the top of his. Me? I like it just as it is.
I think it is really tasty and think you should try it!

Tuesday, June 5, 2012

Not Everyone Likes a Milkbone

I can't tell you why, but Finn does not like Milkbones. At all. In fact, we tried to use Milkbones as a way to get him into his kennel at night, and every morning we have seen them hidden away in his crate. Wouldn't he eat one or two if he liked them? He doesn't like treats!? What? That's ludicrous. Being that he is a puppy, treats are kind of a "big" part of training. Well, not super big, but big enough.


Since he is as cute as he is, I decided to make some treats for him... and it was very easy. I only needed a few ingredients (5!) and a super cute cookie cutter to make these treats. I can't tell you where the recipe was found, I found it in an old recipe box that was given to me (which was pretty neat, by the by).

Here is everything you need:

I forgot to take a picture of the milk!


2 cups of whole wheat flour
1 tablespoon baking powder
1 cup peanut butter
1 cup milk
1 tablespoon honey

First, mix the flour and baking powder. In a separate bowl, mix the milk, peanut butter and honey until it is well combined. Once that is well mixed, add the dry ingredients. Mix this, too, until it forms a nice dough. Roll it out on a floured surface to the thickness of about a quarter inch. Use a cookie cutter to make fun shapes for the biscuits (I used an old aluminum pan to make a bone shaped cookie cutter).

Needless to say, Finn loves these treats! I even gave some to my K-9 sister (Mad) and my puppy nephews (Duke and Louie). They liked them, too!

Tuesday, May 1, 2012

Holy Busy, Batman.

Here's the thing.

I am home right now, and have been for about 15 minutes. I need to leave in 25 minutes. This is my life for the entire week, and next. Needless to say, it is a busy time of year. I feel like the husband and I have been go-go-go for at least a month now. In fact, I don't remember the last time I actually went grocery shopping and bought more than just what was needed for that night's dinner. I don't like that.

I did get the chance to run to the fabric store. Let me admit something quickly. I was crabby Saturday afternoon. Since I was home alone, I decided to head to my local fabric store to learn that it will be moving in a few weeks. SALE!

I bought $110 worth of fabric and paid $23. Totally awesome. I have some awesome plans for the fabric: pillows, a skirt for my niece, pants for my nephew. I can't wait to start creating and show you all the awesome things I make! Wait a minute, though. I don't know how to sew very well (I'd call myself a novice!), so we'll see how these projects actually turn out...

Monday, April 23, 2012

Garden Beds!

Finalmente, my husband and I bit the bullet and make our garden beds. When we moved into our home, there was a small wooden box filled with sand. Since the previous owners had a small child or two, we figured it was a sandbox turned stray cat litter box (seriously, gross).

Being that the husband and I don't have kids (and when we do, they will have a much bigger sandbox!), we decided to make it a garden. Last year, it housed our potatoes, onions and sunflowers. The sunflowers and potatoes did fabulously. The onions...not so much.

Our dream, though, was to add three more raised beds to make our garden more fruitful. Our seeds have already been started (the tomatoes aren't looking so hot) and will need to move into the ground sooner, rather than later. With the free time that we had yesterday, we headed to Menard's to pick up some cedar (hooray, it was on sale!).

We made three 4 foot by 4 foot boxes that have 10 inch anchors in each corner. Well. Our original plan was to have them be anchors. We are now discussing the possibility of using them as a fence post to protect our veggies from the rabbits I have seen in the yard. We'll see what happens when we get to putting the garden beds in the ground.


Isn't it pretty!?

Thursday, April 19, 2012

Tapping Trees

This "winter" (if you can even call it that in Minnesota this year), my husband and I tapped our silver maple trees. I had the idea when we first moved into the house, but didn't realize until this winter that any maple tree can be tapped. Not just sugar maples. Sweet! We have three silver maples and tapped two of them. It was extremely simple and unbelievably awesome.

First, my husband drilled a hole into each of the two trees. We had to drill at an angle so the sap would run more fluidly. In the photo, you can see the metal spile in his hand. This is put into the drilled hole and then tapped a couple of times so it is secure.


On the spile is a small hook to hang the bucket and lid. If the trees are tapped at the right time, the sap will start flowing immediately. Unfortunately, with the crazy winter we had this year, we had tapped too late. It was warm enough during the day, but wasn't getting cold enough overnight.


After the first night, we didn't think we'd get any sap. In fact, from one of the trees, we didn't. Not even a drop. That was a bummer, but we did end up with quite a bit from the second tree. Our spirits were lifted! You can store sap in the fridge for up to a week, so we had to boil rather quickly.

It was so interesting. Sadly, I didn't get to be present for the boiling portion of syrup making for very long. My aunt called with a delivery, and I needed to be there. I left my husband to the boiling and didn't get any pictures. BUT! We made syrup! Six whole ounces of syrup!

The only thing I can say is that homemade syrup is amazing. And I can't wait for next winter to tap the trees again!

Saturday, March 10, 2012

Lull

I've been on a blogging lull as of late. I'm finishing up some coursework for my master's degree and it has taken its toll on me. Who knew a master's was so much work!? Just kidding...I knew going into it that it would be a TON of work. I am set to be completely done, though, at the end of the next school year. I have just under a year and a half left. Pretty exciting!

Like I said, though, it has taken its toll on me. I'm tired. It's hard to go to school when you're working full time--be that working full time as a mom or in the business world. It's just tough.

As summer nears, though, I am looking forward to having more time at home. I'm a teacher, you see, and school will be wrapped up by June. Of course, I nanny during the summer, so I don't get to be a stay at home wife (no kids, yet!). I will still be working three days a week, but will absolutely adore the Mondays and Fridays that I do not work.

I've already started a list of projects that I would like to finish by the end of summer. I don't want to say they are summer projects, because I hope to get to them during the school year too.

My list of projects:
  • paint the ugly fish stand we have
  • paint the house (outside)
  • paint the kitchen and hallway
  • re-do our deck (specifically, the stairs...they're wobbly and lopsided)
  • garden! (seeds are going to be started tonight or tomorrow!)
  • learn how to make pickles
  • make a piece of art for the blank wall we have above the stairs/in the entry way
I could continue, because now I'm getting into the brainstorming mood and the ideas are starting to flow...but, I have to run to the grocery store for our dinner feast.

Don't forget to change your clocks!

Sunday, February 26, 2012

The Wall...

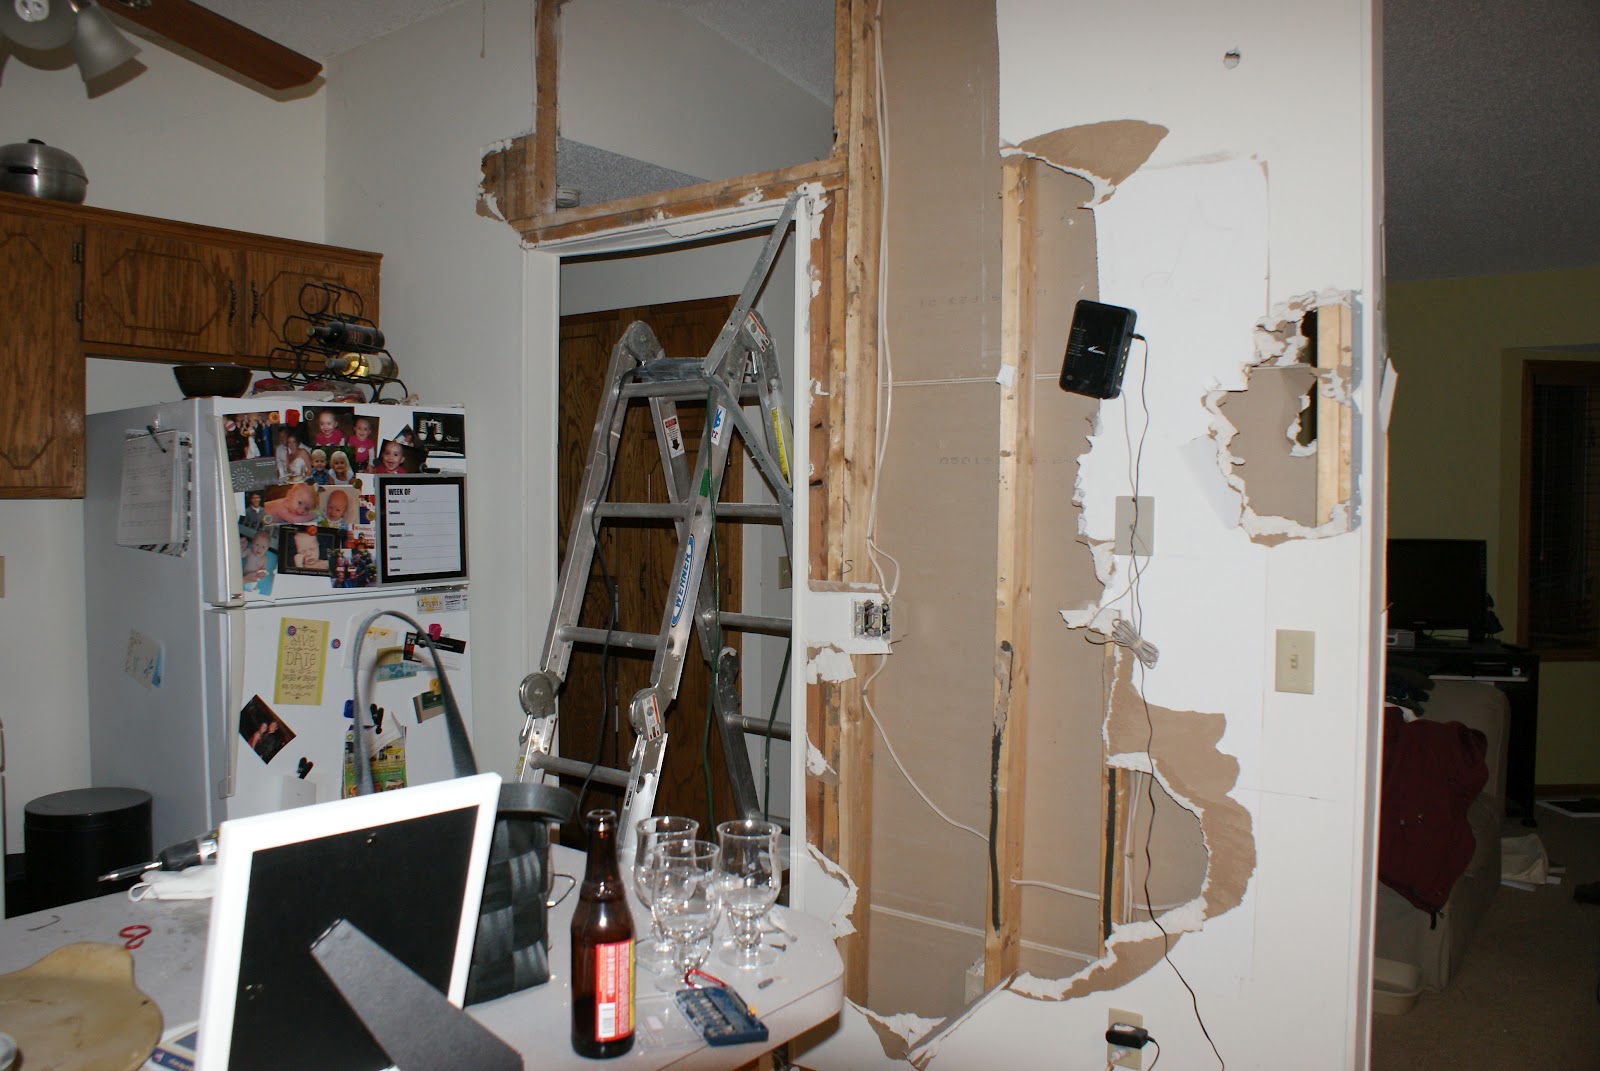
If you have read the post about wall demolition, you will know that husband and I have been tearing down the wall that separates the kitchen/dining room from the living room.


Everything is moving along fabulously, and the husband and I are just letting the mud dry. I've been told (who knew?) that the joint compound will contract when it dries, which means that we may need to go over it once or twice more. And that is okay by me. Here's how everything looks now (please excuse the mess, we started this whole project without cleaning up/putting things away):


Last night:


 This morning:


This moment:


I have to admit that it is rather exciting to have the wall completely gone. I love it. It definitely means that we will have to keep our kitchen nice and tidy at all times (that's a tough one). Our living room is so much brighter now (there are no ceiling lights, only a lamp or two). With the wall gone, the natural light from our sliding glass door and the kitchen window do wonders for the lighting situation.

Like I said before, we still have some joint compound to add. And then, I know that the husband and I will want to paint straight away. I already have a color in mind. It's called Olivewood, and I adore it. At this point, it is the color of our entry way. But, with the dreams I have for the kitchen cabinets, Olivewood would work wonderfully in the kitchen and dining room. Plus, we have two walls that are painted with Glidden's Soothing Green Tea. I think the Olivewood would really tie everything together.

I love big projects (and I am most thankful that my husband does, too!).


Saturday, February 25, 2012

Project: Organize #2 ~ The Kitchen Sink

When I read about this project idea on The Complete Guide to Imperfect Homemaking my plan was to do one organization project each week. That didn't go exactly as planned, as I started a week or so late. I finished Project #1 last weekend, and finished the kitchen sink an hour or so later. I just haven't had time to post until now!

Ahh, the kitchen sink. You can read about organizing underneath the sink at a lot of blogs and on a lot of other websites, which is great. Most of them portray similar ideas: that cabinet can become a catch-all of stuff that doesn't otherwise have a home. It can also be a place where items get lost: think "Land of the Misfit Toys." Only we aren't dealing with toys here.

Like all kitchen sink cabinets, most of mine is hard to access because of the plumbing and the garbage disposal. Not many things can get beyond the sink's drainage system. I attempted to organize away anyway. This time, I gave myself a rule:

Do not spend any money.

I found that the change in the kitchen sink cabinet wasn't that crazy (unlike the pantry organization!). It just became a bit more "tidy" if you will. It is definitely more appealing to the eye, and only a couple of items were removed from the cabinet all together. Those items were removed to the laundry room, which I thought was a better fit (I don't need the CLR in my kitchen!).

Here's the before:


And here's the after:


You see, it isn't a huge change by any means. But, having it this way makes me feel a little better (even if the only real change was putting the sponges, never-been-opened rubber gloves, and microfiber towels in a bucket). Eventually, I will let myself spend a few dollars on this cabinet, because I really like the way this looks at The Complete Guide to Imperfect Homemaking.

Friday, February 24, 2012

Demolition

We've started wall demolition and an experience it has been! As mentioned before, we had a construction buddy stop by. We were told that the wall was not load bearing and could be taken down (hooray!).


The big, ugly, useless cabinet was emptied during the pantry reorganization (another big hooray!).
Do you see how horrible it is? It isn't that deep, which is the problem. You know the big cans of tomatoes? Crushed, stewed, whole, etc.? Think of the diameter of that can (I think it's the 28 ounce size). That's how deep the pantry is. Useless, just useless. Plus, you can see in the bottom right corner of the picture, there is a counter top. That is our peninsula. Makes for a little walkway between the kitchen and dining room. Key word: little. After emptying the cabinet, it wasn't missed even a little bit.


So...after dinner the other night, we took it down. And it was frighteningly easy. And now, amazingly g-g-g-gone!
Oh yeah. We put some holes in it too. You see, here is the story:


First came the hammer.
Then came the (big) holes.
Then came the...

  • Why are there two 2 by 4s in there?
  • What does that note say? (there was an inspector's note nailed to the doubled up 2 by 4s).
  • Can I put more holes in the wall? (that was from my lovely husband).
  • Let's call a home inspector (that was from the sensible wife).

So, when I started thinking about this post, I was going to say that now we'd have to wait to hear from the city's building inspector and that we hope that the wall is not load-bearing and that we will live with a wall that is half destroyed.


But the wonderful husband went to the city right after work and found out that "what? That wall? That's not doing anything."


And, as I type, our wall looks ... fabulous? It doesn't look that fabulous right now, but the husband is pounding and demolishing away.


And soon, there will be no wall!


Saturday, February 18, 2012

My New Favorite Soup Recipe

I have a new favorite recipe and, as the title suggests, it's for soup. Really yummy soup.

My original plan was to make Beef Barley Soup using this recipe, but I found the recipe in the morning and wanted to eat the soup that night. And, there just wasn't the time in the day to hit up the grocery store. I didn't have the chuck roast, but I had stew meat. I didn't have the barley, either. So, I improvised. Big time.

Here is what I had (and what I used):
-Stew meat
-Frozen carrots
-Frozen peas
-Frozen green beans
-Vegetable oil
-Bay leaves
-Beef broth
-Beef bouillon cubes (only two of them!)
-Garlic and peppercorn grinder

Here's what I did:

First, I browned the meat using a small amount of vegetable oil and a generous supply from the garlic and peppercorn grinder. If you don't have this fantastic grinder, I suggest you pick it up. It is a great addition to a lot  of meals. I especially like it on scrambled eggs and in my homemade spaghetti sauce.

At the same time, I poured a little more oil into a stockpot and dumped in a fair amount of frozen vegetables (in writing this, I've come to realize that I did not measure a thing while making this soup...whoops). I didn't use a ton of green beans, because they're not my favorite. In fact, next time, I think I'll leave them out. I did, however, use a lot of peas and carrots. YUM!

I can't tell you how long I cooked the vegetables...when the carrots tasted mostly done, I added the beef, broth and two bouillon cubes. I sprinkled on some more garlic pepper and dropped in two bay leaves. I probably simmered the soup for 15 to 20 minutes and served it right up, with homemade rolls. It was delicious-and Mr. Husband thought so, too!

I'm sorry this isn't written like a normal recipe with clear cut measurements, steps and cook times. I plan on making the soup again this weekend, so I'll pay more attention to the details.

Saturday, December 31, 2011

Quick Update

Life has been wonderful these last few weeks. There were 9 Christmas celebrations that Mr. Husband and I attended this year, and we enjoyed each one! Have to admit it...that doesn't always happen. Gathering large families can sometimes be difficult and irritating. That was not the case this year!

A couple of quick updates:

The wall I had mentioned in the previous post; the one I want to tear down. Our construction friend didn't make it out until yesterday, but brought with him good news! Our wall can be torn down. We are both very excited and have started to "draw" some plans of what we would like to do with the kitchen. Of course, we won't be tearing the wall down any time soon. If the wall comes down, the kitchen would need to be redone. That's just not in the budget right now.

On another note, we made homemade pizza last night. Simply one of my favorite things. Having a bread machine really makes life easy. I put all of the ingredients in the bread machine, pressed a couple of buttons and an hour and half later, the dough was ready to be rolled out and topped. Pepperoni and cheese were the toppings of choice, and quite frankly, I wasn't in the mood for pepperoni...so I left it off of a few pieces. I also like to sprinkle oregano and a bit of garlic on top of the pizza before baking, then a little bit more oregano half way through the baking process. Makes for some yummy pizza!

To continue with the cooking theme, I have greatly enjoyed my crock pot. I've already used it twice for today: once for a turkey breast recipe that called for an entire bottle of wine (it wasn't that good; next time I will use broth) and now for delcious (and super hot!) buffalo wings. Here is the recipe. Side note: I just went to their full website for the first time and it looks like they won't be updating anymore. BUMMER! I was excited to explore. Anyway, I didn't have enough ingredients to make the sauce, which is why the wings aren't completely covered. I figure that there will be enough sauce in the bottom of the crock pot to stir and cover the wings. I taste-tested the sauce (yum!) and it was HOT. I'm excited to taste when completely done.

Well, happy new year's eve to all!